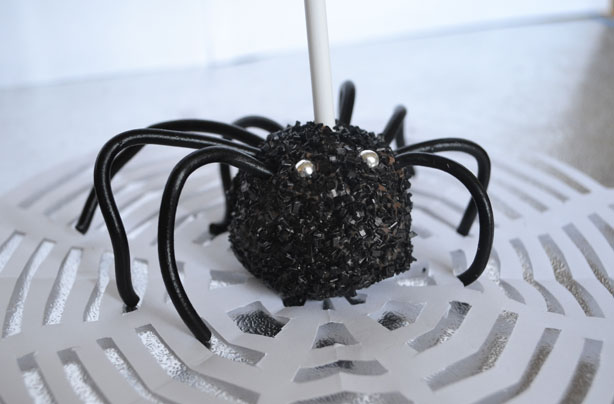
It takes just seven ingredients to make these spooky spider cake pops.
The kids are going to love these Halloween cake pops are shaped like spiders. “They’re perfect if you are short on time, as we used shop-bought cake to speed things along,” says mummy blogger Anneliese. “However, please feel free to make your own sponge or make use of any leftovers if time is on your side. Your child can get hands-on when helping to make these creepy-crawly pops; there’s crumbling, stirring, shaping and of course, decorating.”
Ingredients
- 175g white chocolate (use milk chocolate if preferred)
- 285g sponge cake (Madeira, chocolate etc.)
- 15-20g milk chocolate to attach lollipop sticks
- 200g milk chocolate
- 100g black sugar crystals/black sprinkles
- 80g liquorice laces
- Silver balls (dragees)
- You will also need 16 cake pop sticks/lollipop sticks.
WEIGHT CONVERTER
Method
- Ask your child to break the white chocolate into squares and place into a medium sized microwaveable bowl. When baking with my boys I melt the chocolate in the microwave as I find it easier. However, you do need to keep an eye on it as you don't want to end up with burnt chocolate – it doesn't taste good!
- Place the bowl into the microwave and melt the chocolate on a high heat but be sure to stir every 20 seconds, until the chocolate is melted. Leave the chocolate to cool for a minute or two to avoid burnt fingers!
- Your helper can now have the fun of crumbling the cake into the bowl of chocolate. I did catch my little boy indulging in a few tasting sessions as he worked, so we had repeatedly to visit the sink to wash his hands!!
- After all the crumbled cake is in the bowl you can stick your hands in to 'squidge' the cake into the melted chocolate. It might be wise to pop your hands into the mixture before your child, just to be sure that the chocolate is cool enough for them to handle.
- Your child can now have the fun of gathering up small handfuls of the mixture and rolling and shaping into balls; they will need to be about the size of a golf ball. Children will love using their hands to do this and it's a task they can do all by themselves; be prepared for proud faces!
- The cake balls can be placed onto a lined baking tray to await their lollipop sticks.
- You now need to weigh and melt the small amount of milk chocolate in the same way that you melted the white chocolate earlier. This time it won't take long at all for the chocolate to give in to the heat, so watch it closely.
- Dip each lollipop stick into the melted milk chocolate and then carefully insert into the top of each cake ball. Try not to push the stick all the way in as you may end up with a few casualties; just over half way is perfect!
- Now the cake pops need to go into the fridge for at least half an hour to firm up. The lollipop sticks are rather long, so make sure that you have plenty of headroom available in your fridge.
- While the cake pops are chilling in the fridge you can gather up all you need for the all important decoration.
- Melt the larger quantity of milk chocolate in the microwave in a microwaveable bowl, as before. Leave it to one side to cool down. Too hot and it will melt the chocolate you used to insert the lollipop sticks.
- Place the black sugar crystals/black sprinkles onto a plate and use scissors to cut the liquorice laces to size – about one and a half inches for each 'leg'. You will need to make eight legs for each of your 16 cake pops so you have 122 legs to snip!
- After at least half an hour has passed, take just three or four cake pops from the fridge at one time. Leave the rest in the fridge until you are ready for them, as they will be trickier to work with if they are at room temperature.
- Carefully dip the bottom of a cake pop into the cooled melted chocolate then use a teaspoon to guide the chocolate up and over the sides and top. Gingerly tap the lollipop stick on the side of the bowl, very lightly, to allow the excess chocolate to fall back into the bowl. The cake pops only require a thin layer of chocolate.
- Roll the chocolaty cake pop through the black sugar crystals/sprinkles, then place onto a lined baking tray. Repeat this process with each cake pop.
- Use a little spare melted chocolate as a glue to stick on the silver balls for the spiders’ beady eyes.
- Use a cocktail stick to carefully make eight indentations around each spider’s body; this is where the legs will be attached.
- Gather up the liquorice legs and gently push into the indentations. Stand back and admire your leggy friends!
Top tips for making spider cake pops:
If you can't find black sprinkles you could always use chocolate sprinkles instead.
You might also like...
Halloween cupcakes
Parenting advice, hot topics, best buys and family finance tips delivered straight to your inbox.

Author, writer and Mum of three, Anneliese Giggins has been creating recipes for Goodto.com for the past 9 years. She has also created food-related content for household names such as Daily Mail, Daily Express and Goodto.com. Her most successful to date was how to feed a family of 4 on £20 a week.
